House Rabbit Community and Store
OUR FORUM IS UP BUT WE ARE STILL IN THE MIDDLE OF UPDATING AND FIXING THINGS. SOME THINGS WILL LOOK WEIRD AND/OR NOT BE CORRECT. YOUR PATIENCE IS APPRECIATED. We are not fully ready to answer questions in a timely manner as we are not officially open, but we will do our best.
BUNNY 911 – If your rabbit hasn’t eaten or pooped in 12-24 hours, call a vet immediately! Don’t have a vet? Check out VET RESOURCES
The subject of intentional breeding or meat rabbits is prohibited. The answers provided on this board are for general guideline purposes only. The information is not intended to diagnose or treat your pet. It is your responsibility to assess the information being given and seek professional advice/second opinion from your veterinarian and/or qualified behaviorist.
What are we about? Please read about our Forum Culture and check out the Rules.
The subject of intentional breeding or meat rabbits is prohibited. The answers provided on this board are for general guideline purposes only. The information is not intended to diagnose or treat your pet. It is your responsibility to assess the information being given and seek professional advice/second opinion from your veterinarian and/or qualified behaviorist.
› Forum › THE LOUNGE › Pumpkin carving info, tips, techniques, sharing etc
Sorry, I took the liberty of starting a new thread so that the cuteness of Boston’s pumpkin experience didn’t get overtaken!
So I thought it might be good to have a thread where we can share information on pumpkin carving etc. There seem to be a few of us on the forum that really enjoy it, and others that would like to get more into it.
I’m personally a fan of the shading technique. Some call it sculpting but it’s really not, especially compared to the ones that really are sculpted. For me I find it easier than the traditional cut-out technique, mostly because I’m pretty useless with the saws and knives used for cutting out, they never turn out the way I want and I always cut off pieces that I’m not supposed to.
So in 2005 I was in the store and I saw this:
I don’t know if they still have it on the market anymore, but I did find that Crate and Barrel has a similar product – it’s more expensive than the Pumpkin Masters one but the pieces are metal and likely better quality.
That year I did 2 pumpkins:
and
The Happy Halloween is the last cut-through pumpkin I ever did. The shaded cat is one of my favourite ones, and I think I’ve done it every year since then.
I keep getting a little confused and often say 2006 is the first year I started the shading, but it was 2005. 2006 is the first year I went out looking for more involved patterns to do. I found some wonderful sites with patterns and information, and in 2007 a fantastic forum.
The shaded pumpkins do last a little longer than the cut through, I think, but you still have to go through the process of cutting the top off and gutting it so it’s still going to get some decomposition that way. You can put some petroleum jelly on the cut/shaded areas to keep them moist and prevent shrivelling. Spraying them with a water/bleach combo is apparently good too, I’ve also read that using a disinfectant spray like Lysol will work to slow down the decomposition process. I tried that last year and it seemed to work okay – and I used the apple scent Lysol so I had a really interesting apple/pumpkin smell in the kitchen for a while.
This year I picked up a set of wood-carving tools to use on the pumpkins – looks to be pretty much the same as the little plastic tools that came with the kit except sturdier, and more variety.
Oh, one tip I found that helped a lot – if you use a pattern for doing the pumpkins, either cut-through or shaded, you can tape or glue the pattern paper to the pumpkin, use the little poking tool or a knife to poke holes in or score the skin of the pumpkin, remove the paper pattern and then go over the pumpkin with talc or flour – it’ll go into the holes/scoring you’ve made and show you the outline of your pattern.
Some helpful sites:
http://www.carvingpumpkins.com/ – lots of free patterns, some fantastic members-only patterns (subscription is cheap), and a great forum
http://www.stoneykins.com/ – lots of free patterns and some amazing members-only patterns (again subscription is cheap)
http://www.zombiepumpkins.com/
http://www.jamminpumpkins.com/
– Annette
Great thread! And wow, very talented with the pumpkin carving!
I have a tip for the novices, like me – don’t buy the cheapy cheap tools. I think a spent a couple of bucks on some pumpkin carving kit, and the all broke. You may need to spend a few more bucks to buy tools that can withstand your clumsy carving rookie techiniques….or maybe that’s just my issue.
That’s very true! Not that you have to go all out and buy the super expensive stuff, but generally if you use things that aren’t good quality then you’re likely going to be unhappy with the results. It’s hard to be comfortable and semi-confident with the carving if you’re afraid that the tool is going to break!
– Annette
When I know of something I want to make, I create a stencil of it. First I take the picture, convert it to black and white, then turn the contrast up. I tape the stencil onto the pumpkin, do a dotted line through the stencil along the whole pattern, then remove the stencil to do the actual carving, using the picture and stencil as a reference.
Here’s an example:
Step 1: Find a photo.
(this was the original size)
Step 2: Covert it to black and white.
Step 3: Remove unecessary background, stretch picture to desired size. (I shrunk it down for uploading purposes)
Step 4: Turn up the image contrast. Make alterations if necessary.
Step 5: Tape on the stencil, outline it. Carve that sucka and display proudly!
WOW!! That’s incredible.
I haven’t attempted to make my own patterns yet, but I will at some point. There’s a tutorial on the http://www.carvingpumpkins.com website that’s very much like the technique you use Rachel, using the “posterize” function in paintshop pro.
I’m always in awe of people who can actually make patterns – that’s a great job Rachel.
– Annette
wow those are incredible wish i could do something like that!
*must find a picture of Bunnicula to use Rachel’s method with*
I went cheap and got a pumpkin that already has a painting on it. I thought it was a cat but when I got it home the kids told me it was a bunny face. So now, with the other pumpkin that I intend to carve, I want to make a matching Bunnicula sculpted lantern.
When you sculpt instead of carve though, do you need to remove inner flesh? And if so, which part is okay to give to your bunnies again?
When you do the sculpting you do need to scrape out the inside – in fact possibly a little more than with the cut-through method because you want to get a nice glow from the light or candle through the pumpkin. I think it’s the regular pumpkin flesh that bunnies can eat – I don’t think I’d feed them the stringy “guts” of the pumpkin.
This year I did 2 of the Michael’s craft pumpkins (I’ve been calling them fakekins, lol). The first one was a thanksgiving pumpkin (useful for Canadian and US thanksgivings!). The second one I just finished off tonight, and it’s the Winnipeg Goldeye’s basebcall team logo. I decided to do it on a fakekin ’cause I’m planning on taking it in to their office. Mind you they don’t actually know this yet, maybe they won’t want it! I’ll do another one for myself on a real pumpkin closer to halloween.
– Annette
I am not a pumpkin-carver, and haven’t done it since I was 12-ish (I hope to do one this year, but I promise it will be amateurish!).
BUT I am a Food Network junkie! Next Sunday, the new Food Network Challenge is PUMPKIN CARVING! I’m totally excited! (And they implied that next week’s secret ingredient for Iron Chef is blood…eeewww, gross! I’m so there!)
A few things I’ve realized/have been reminded about over the last few days:
– Keep a few copies of your pattern around. Tape or glue (glue works really well) the pattern to the pumpkin. There’s a craft spray adhesive that lets you remove/reposition the pattern – it’s used a lot for stenciling and would work wonderfully for pumpkin patterns. But once your pattern is on the pumpkin, and you poke or cut through it, well oddly enough you don’t have your pattern anymore. So I’ve found it really handy to have a copy of the pattern to follow along with while I’m doing my carving, so that when I’m partway through I can look at it and say oh yeah that’s what this thing is supposed to look like, or oh okay that’s why I left that piece of skin on there.
– If you’re doing the shading method, having a light source that you can stick inside the pumpkin is really handy. I use one of those hanging worklights with a 25watt bulb in it – bright enough to mimic a candle but not so bright that I’m going to leave it too thick for candle light to show through. And with the work light I can leave it in while I’m doing the shading so that I always know exactly what it’s looking like.
Having now done 2 of the fake pumpkins I can tell you those things are HARD! I know that a lot of people who carve them often get negative comments from people like oh that’s not a real pumpkin and they assume that just because the pumpkin itself was store-bought that it was bought with the carving on it. After having done these 2 I have such a respect for the people who do them! It’s dusty and annoying and hard and… ugh. I’m happy to stick with real ones.
– Annette
BUT I am a Food Network junkie! Next Sunday, the new Food Network Challenge is PUMPKIN CARVING! I’m totally excited! (And they implied that next week’s secret ingredient for Iron Chef is blood…eeewww, gross! I’m so there!)
Is that the “Outrageous Pumpkins” one? If so then one of the contributors on the Pumpkin Wizard forum is one of the contestants. This guy does truly amazing stuff. This is one of his latest creations:
– Annette
I think this year I’m going to try making some “windowkins” as well as doing the pumpkins. Windowkins are basically just pumpkin designs but cut out of black posterboard or felt and put up on windows.
There’s a great tutorial for them at http://www.stoneykins.com/Windowkin_1.html
And this is what they end up looking like:
Mine will be pretty simple though since I haven’t done them before. But we’ve got 2 windows at the front of the house on the 2nd floor and I thought it would be nice to do something in them.
– Annette
Those are some cool pumpkins! 
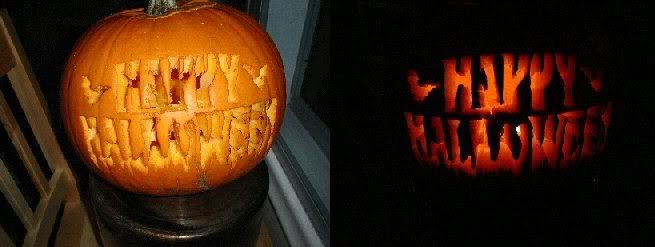
I just finished cutting out two of the artificial pumpkins and S&A are right they are hard to carve! Definately use a lot of tape to hold the stencil on, and another tip with using the fresh pumpkins is, place a paper towel underneath the stencil to soak up the juice as you are poking, otherwise the stencil will get really wet and start to get soggy and peel off before you are done poking the design. Once you are done poking the design, rub flour over the holes so you can see them better when you go to cut them out. Make many copies of the same design like it has already been mentioned not only if you need to re-use it, but you can also refer to it while you are carving. If your pumpkin is starting to age and dry out, soak it in the bathtub with a teensy bit of bleach overnight and it will look just like new. Funny thing is, I got hooked on this when I did some seasonal work years ago for Pumpkin Masters and became a master poker. LOL
You aren’t joking. That’s very impressive.
Funny thing is, I got hooked on this when I did some seasonal work years ago for Pumpkin Masters and became a master poker. LOL
Oh no way, that would be so cool! I’d love to work for Pumpkin Masters!! I know that several of the people on the pumpkin forum actually take orders for and sell pumpkins – one of them made this year alone to take his family on vacation – but I’m nowhere close to that level yet. But working for something like Pumpkin Masters would just be a blast I think!
– Annette
I’ve just finished my first-ever “windowkins”. They’re not up in the window yet, right now they’re sitting on my car. I’ll put them up tomorrow and take some pictures of them up and lit. In the meantime this is what they look like unlit:
– Annette
Awww I love the cat!!
Annette you are right, it was really fun working there, but all the poking pooped me out and made my wrists and fingers sore. It takes a lot of patience and longer to poke holes than to carve the pumpkin but if you use the artificial ones, you can re-use them. By the way Annette, those are some really neat windowkins!
› Forum › THE LOUNGE › Pumpkin carving info, tips, techniques, sharing etc